Business accounts
Business accounts enable customers to keep their personal and business orders separate.
Account creation
Customers can create a business account in three ways: signup, conversion, and connection.
Signup
During signup, customers can choose to create a business account instead of a personal account. Personal accounts remain the default.
The following table shows a signup flow on mobile devices:
| Personal tab (default) | Business tab | Learn more dialog (Business tab) |
|---|---|---|
 |  |  |
Conversion
Existing customers can convert their personal account to a business account while keeping their personal account information.
The following table shows a conversion flow on mobile devices:
| Menu entry point | Convert option | Convert learn more |
|---|---|---|
 |  |  |
Connection
Existing customers can keep their personal account and create a separate business account linked to it.
The following table shows a connection flow on mobile devices:
| Add / connect option | Create / connect | Sign up | Log in |
|---|---|---|---|
 |  |  |  |
Account switching
Customers with both a personal and business account can switch between them without signing out.
The following image shows the Switch to business button on the account menu screen:

After switching to a business account, customers have access to the following menu items:
- Team members
- Tax exemption
- Order guides
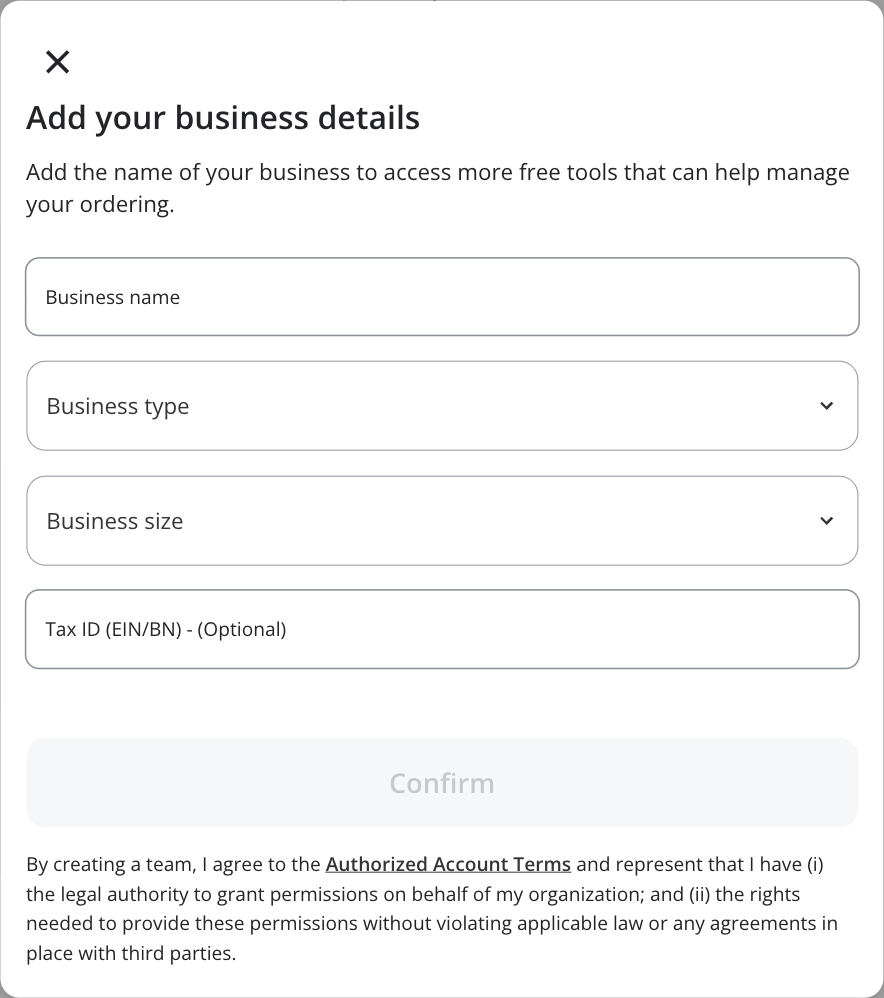
To access the Dashboard or Order approvals from the menu, customers must first enter their business details. Customers are prompted to enter their business details the first time they click any of these menu items.
The following image shows the business details form:
Team management
Administrators can invite team members to join a shared business organization from the Team members page.

Selecting Invite members opens a form to assign a role and enter one or more email addresses. All invitees in that form get the same role and group.
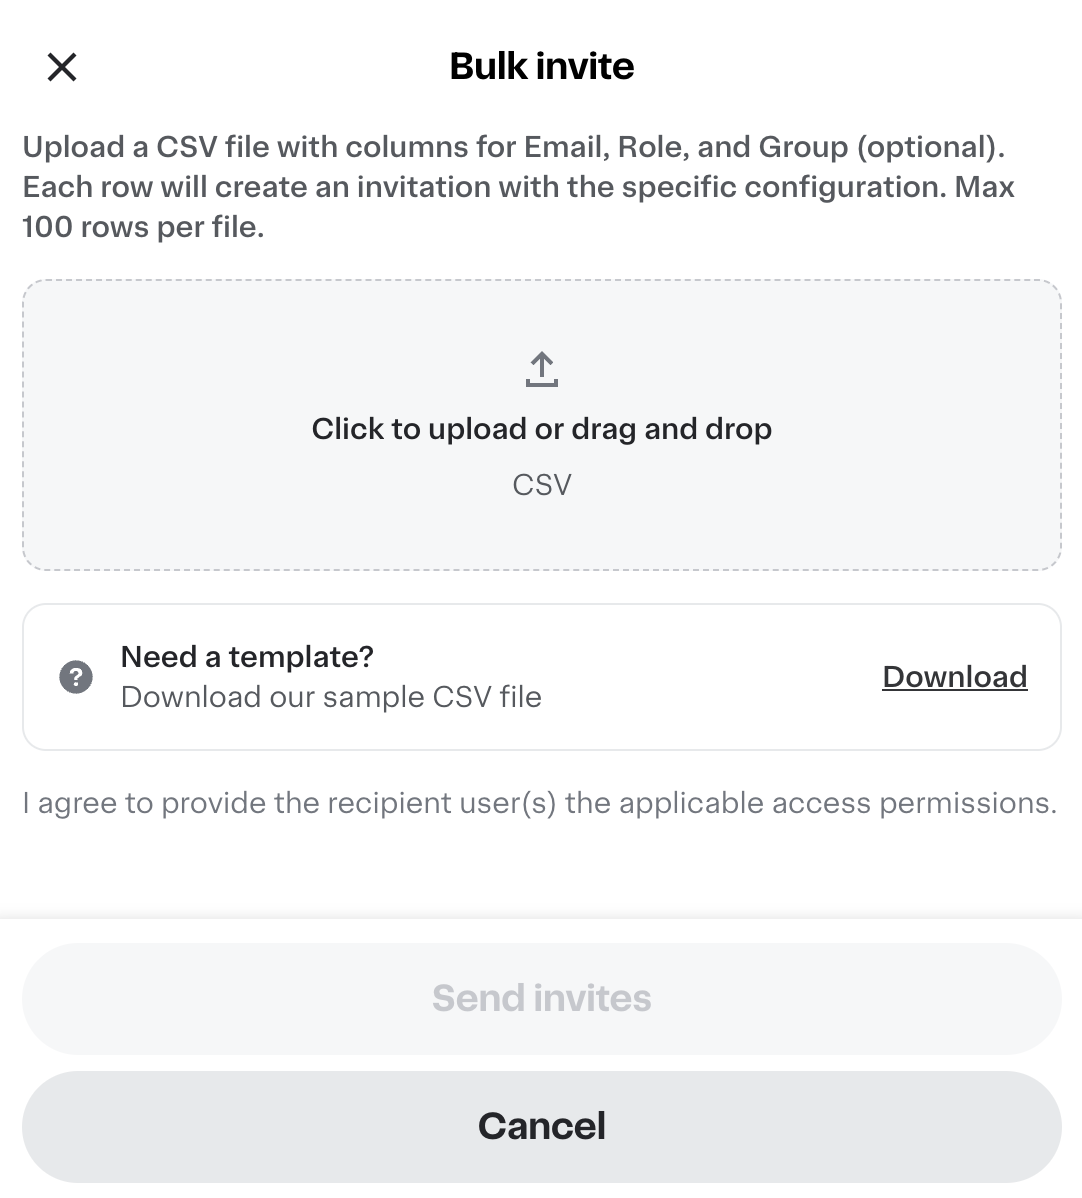
Selecting Bulk invite opens a file upload dialog where administrators can upload a CSV file to invite up to 100 team members, each with their own role and optional group assignment. A downloadable template is available in the upload dialog. If any row in the file contains an error, no invitations are sent. Administrators can download an error report, correct the file, and re-upload.
Invited members appear as Pending on the Team members page until they accept. Invitations expire after 7 days.
Business organizations can have an unlimited number of team members. The following roles are available:
- Administrator. Places orders for the business, manages members, and views analytics.
- Approver. Approves orders placed by team members.
- Buyer. Places orders for the business.
Account groups
Administrators can organize team members into groups. Spend limits and order approvals configured at the group level apply to all buyers in the group.
The Team members page includes a Groups tab where administrators can view, create, and manage groups. To create a group, provide only a unique name.
After creating a group, administrators can manage it from the following tabs:
- Members. Add members to the group in bulk, or move members from one group to another.
- Permissions. Configure spend limits and order approvals for all buyers in the group.
- Settings. Rename or delete the group.
Administrators can also manage an individual member's group assignment from the team members list, or assign invitees to a group at the time of invitation. When using Invite members, all invitees in a single form submission share the same role and group. To assign invitees to different groups, send a separate invitation for each group. When using Bulk invite, each row in the CSV can specify a different group, so administrators can configure each invitee differently in a single upload.
When a team member belongs to a group, the group's spend limit and order approval settings override their individual settings. Individual spend limit and order approval settings are disabled for members of a group.
Spend limits
Spend limits restrict buying on an order, day, week, or month basis and are enforced at checkout. Spend limits also apply to post-checkout order changes.
Administrators can configure spend limits for individual buyers or for all buyers in a group. Spend limits can be added when inviting a member to the team, or when editing the member after they're added to the organization.
The following image shows the screen for editing spend limits:

Order approvals
Administrators can configure Buyer accounts to require approval for all orders submitted.
When order approvals are configured for a group, administrators can choose from the following approval configurations:
- Approvers in the organization. All approvers in the business are notified of and authorized to approve orders. This is the default configuration.
- Approvers in this group. Only approvers who are members of the same group as the buyer are notified and authorized to approve orders.
- Approvers in another group. Administrators select a group from the business. Only approvers in the selected group receive approval requests.
- Specific approvers. Individual approvers are selected manually from across the business.
Approvers can only see orders they are authorized to approve in their pending approvals list.
Account transfers
Administrators can move a user from one business organization to another through the existing invite flow. This is useful for organizations that manage users across sub-businesses, or when users from the same company have inadvertently created separate businesses.
To transfer a user, administrators invite them as they would any new team member. For more information, see Team management. When the user accepts the invitation, Instacart removes them from their original business and adds them to the new organization.
Organization transfer is separate from deactivating a team member. A user who transfers out of an organization does not receive a deactivation email.
To enable organization transfers, contact your Instacart representative.
Dashboard
Business administrators can track and manage business spending from the dashboard.
The following image shows the business account dashboard:

Export orders and receipts
Administrators can export receipts and order summaries from the dashboard or order history page. When exporting order history, administrators can filter by group to analyze spending for a specific group. Administrators can elect a specific group from the Group dropdown to include only orders from members of that group, or select All groups to include orders from all groups. Group filtering is based on the group the member belonged to when the order was placed — if a member moves to a different group after placing an order, their historical orders are not reassigned to their new group.
The following image shows the Export order data screen:

Order summary output
The following table describes data that is exported from the order summary:
| Column Name | Description |
|---|---|
| The customer's email address. | |
| Date | The date and time when the order was placed. |
| Store | The name of the store fulfilling the order. |
| Items | The total number of items in the order. |
| Ordered by | The name of the person who placed the order. |
| Delivered to | The full delivery address, for example, street, city, state, and ZIP or postal code. |
| Amount | The total amount charged for the order. |
Order and item details output
The following table describes data that is exported from the order and item details:
| Column Name | Description |
|---|---|
| The customer's email address. | |
| Delivery Address | The street address for the delivery. |
| Delivery City | The city for the delivery address. |
| Delivery State | The state or province for the delivery address. |
| Delivery Zip Code | The ZIP or postal code for the delivery address. |
| Handoff Type | The method of delivery, for example, doorstep, hand-off, or pickup. |
| Store Name | The name of the store fulfilling the order. |
| Order Type | The type of order, for example, delivery or pickup. |
| Order ID | The unique identifier for the order. |
| Order Item ID | The unique identifier for the line item within the order. |
| Status | The current status of the order item, for example, ordered, picked, delivered, or refunded. |
| Item ID | The unique identifier for the product in the catalog. |
| Substituted By | The identifier of the item that was substituted in. |
| Substitute For | The identifier of the original item that was replaced by a substitute. |
| Delivery Created At | The timestamp when the delivery was created. |
| Delivered At | The timestamp when the order was delivered. |
| Item Name | The customer-facing name of the product. |
| Brand Name | The brand or manufacturer of the product. |
| Aisle Name | The store aisle where the product is typically located. |
| Department Name | The store department the product belongs to. |
| L1 Category Name | The top-level product category, for example, broadest classification. |
| L2 Category Name | The second-level product category, which is more specific than the top-level category. |
| L3 Category Name | The third-level product category, which is most specific. |
| Product Category Name | The broader category that the product belongs to. |
| Size | The product size or unit description, for example, "16 oz", or "1 lb". |
| Cost Unit | Unit of measure for pricing, for example, "each", "lb", or "oz". |
| Alcoholic | Indicates whether the product contains alcohol. |
| Ordered Quantity | The number of units originally ordered by the customer. |
| Picked Quantity | The number of units actually picked/fulfilled. |
| Ordered Weight | The weight originally ordered. |
| Picked Weight | The actual weight picked/fulfilled. |
| Unit Price | The price per unit. |
| Total Price | The total price charged for this line item after adjustments. |
| Currency | The currency code for the prices, for example, "USD". |
Order guides
An order guide is a type of shopping list that outlines recommended items to buy for the business. Team members can add all list items to their cart at once for streamlined buying. All team members can create order guides, and administrators can create and share guides with team members or groups. When an order guide is shared with a group, all current and future team members of that group have access. An order guide can also be shared with a team member both individually and through a group. If that team member leaves the group, they retain access to any guides that were shared with them individually.
Default quantities
Administrators can set a default quantity for each item in an order guide. When a team member adds the guide to their cart, each item is added using the saved default quantity. This reduces manual adjustments for items that are ordered in consistent amounts. Default quantities are managed in the order guide editing experience and can be updated at any time. Existing order guides default to a quantity of 1 per item.
Default quantities can be set when items are first added to the order guide, or afterwards by clicking the Edit items button.
Shopping mode
Team members can enter a dedicated shopping mode to review and adjust order guide items before adding them to their cart. In shopping mode, team members can select specific items and update quantities for their current shopping session. Quantity adjustments made in shopping mode are temporary. They apply to the current cart only and do not change the saved default quantities for the order guide.
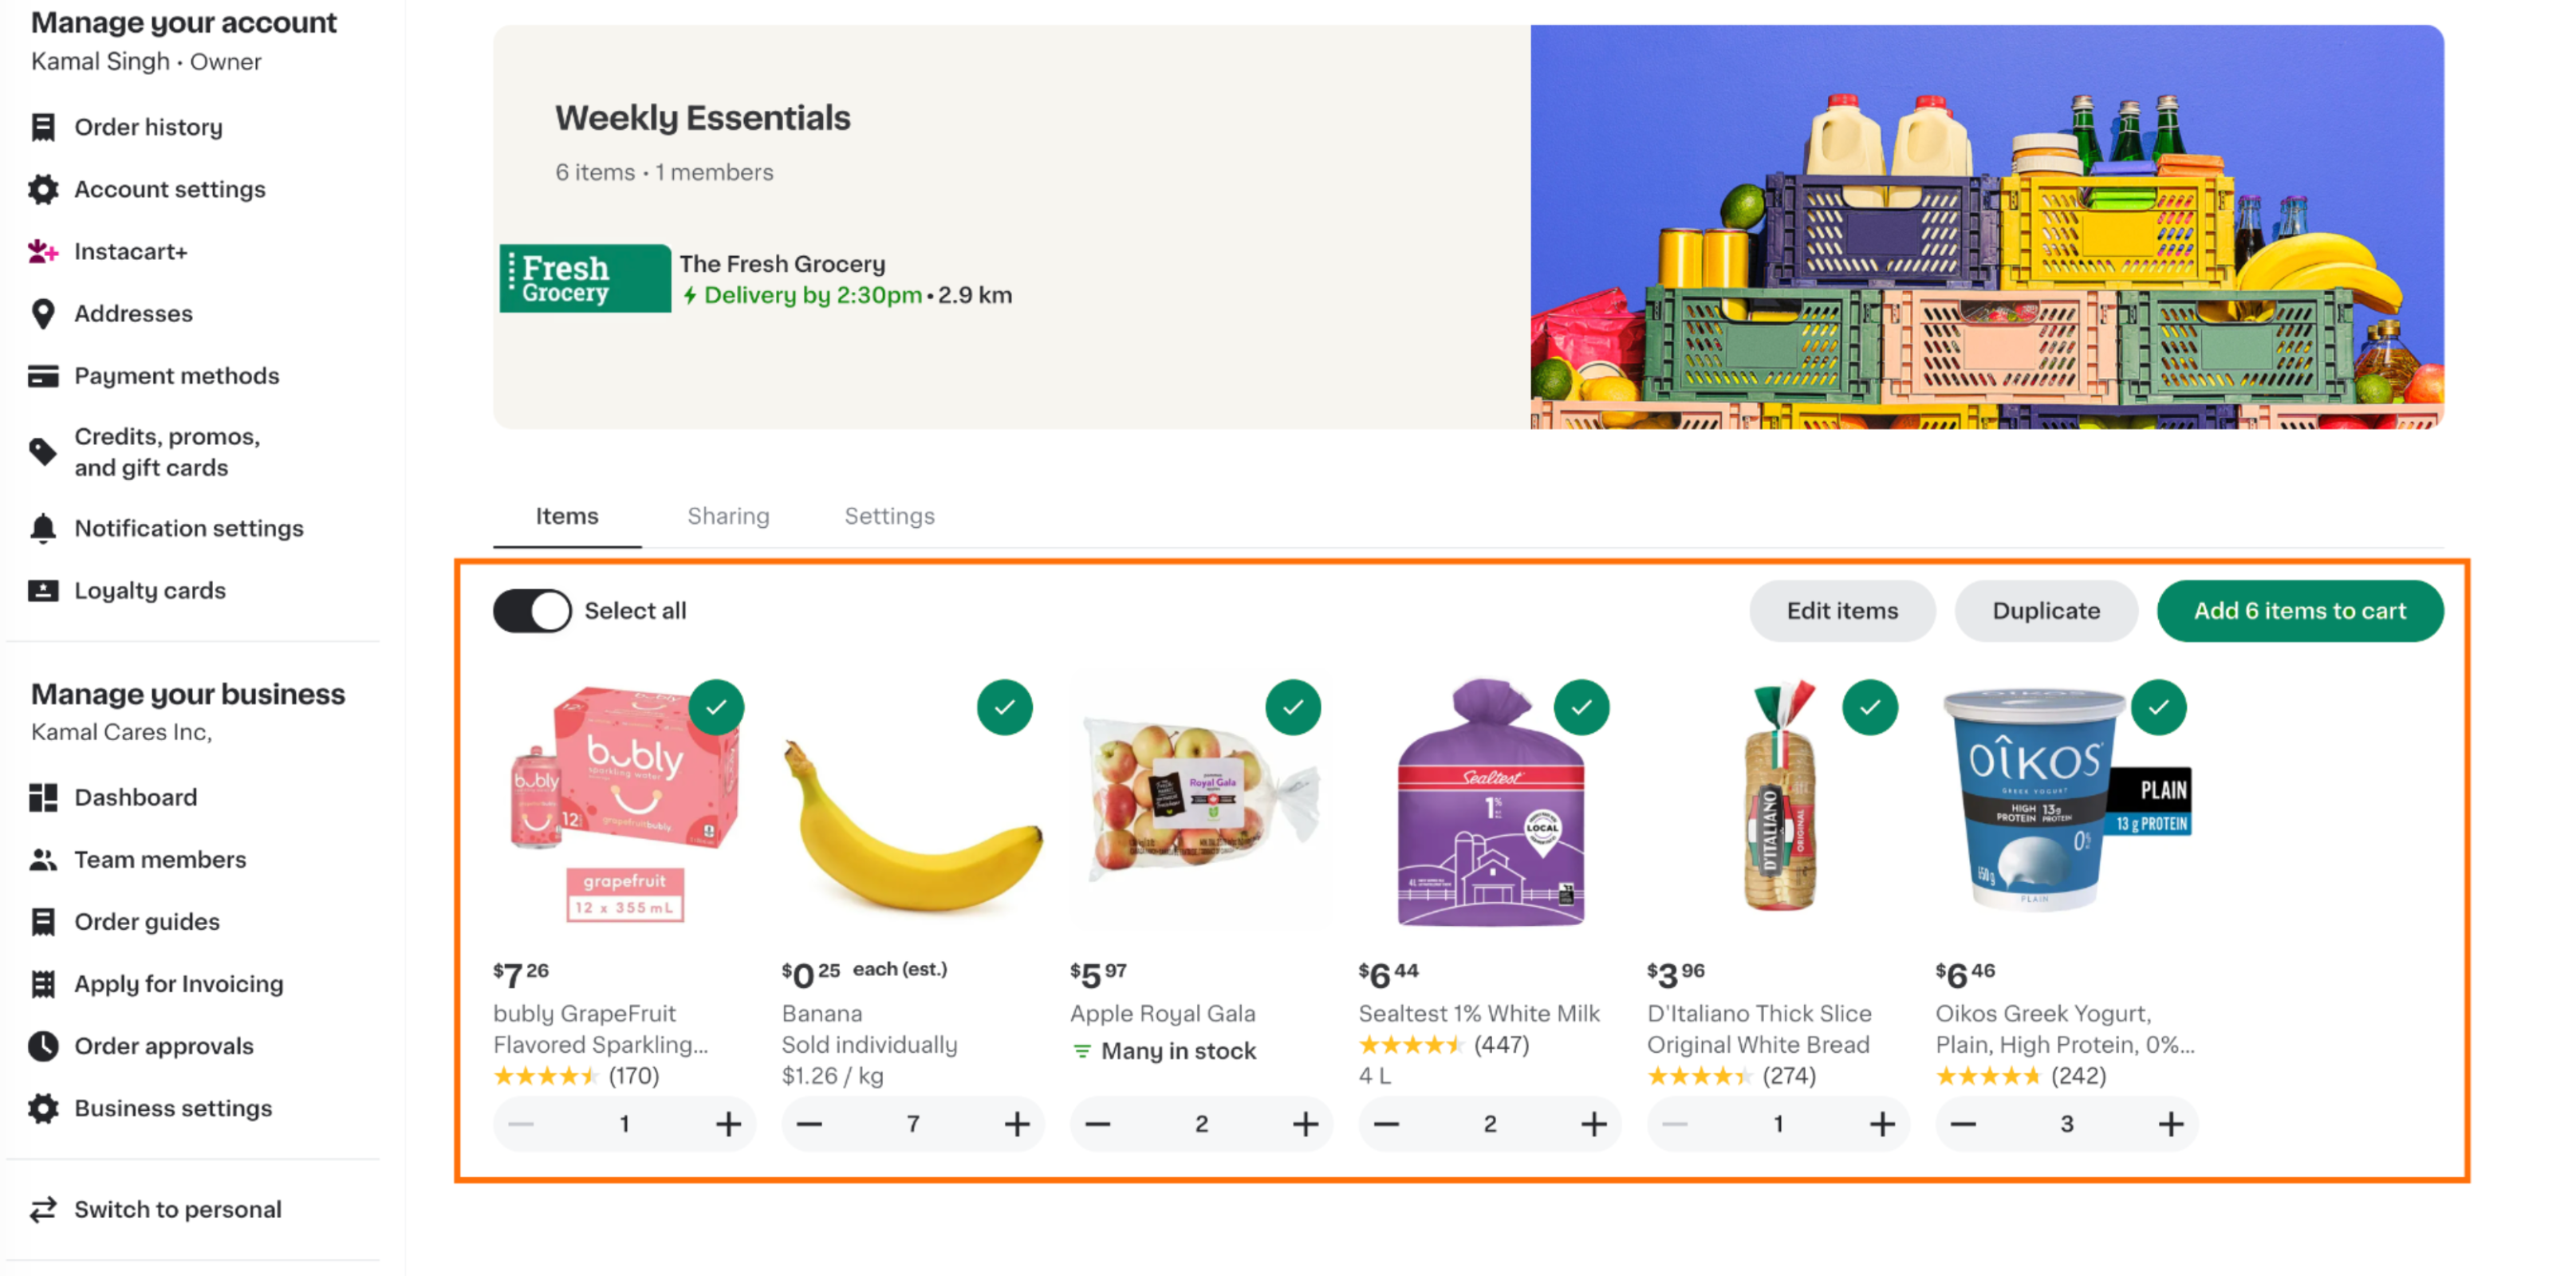
Team members enter shopping mode by clicking the order guide they want to use.
The following image shows the shopping mode within an order guide:
Editing
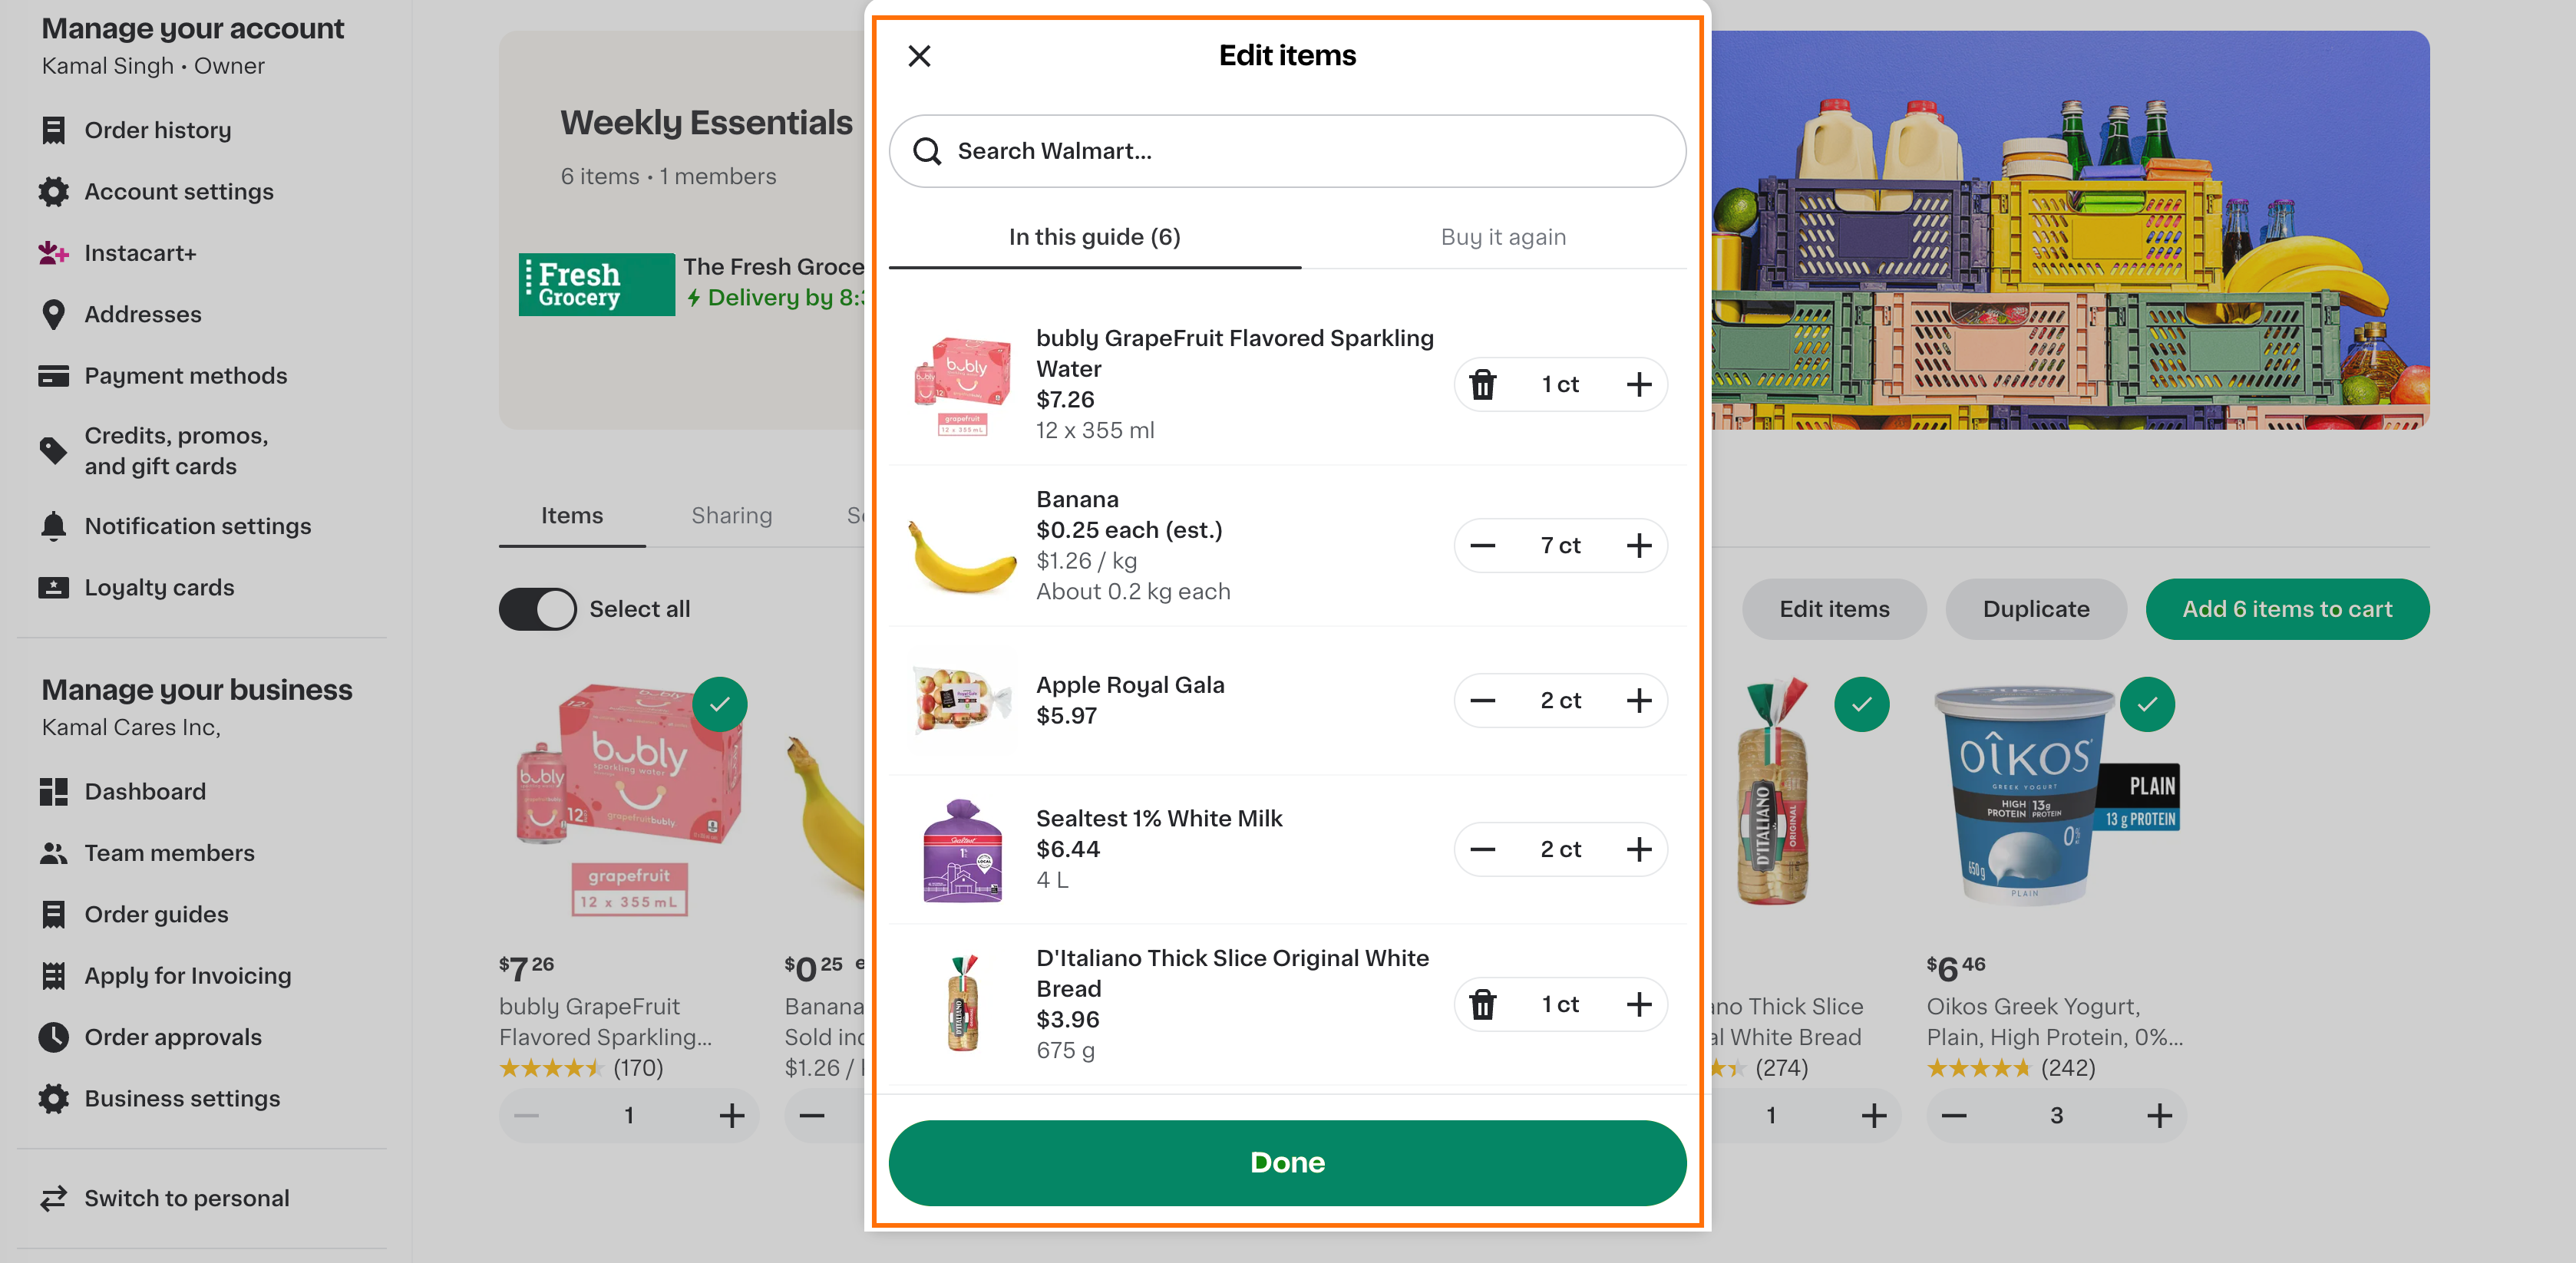
Administrators can edit an order guide to add or remove items, set default quantities, and reorder items. All changes are made from a single editing view. Team members can edit the items in an order guide by clicking Edit items.
The following image shows the Edit items modal within an order guide:
Sharing
Administrators can share order guides with individual team members or with groups. When a guide is shared with a group, all current and future members of that group have access to it.
Business settings
Administrators can use business settings to update their business details, set custom fields for checkout, or manage tax exemptions.
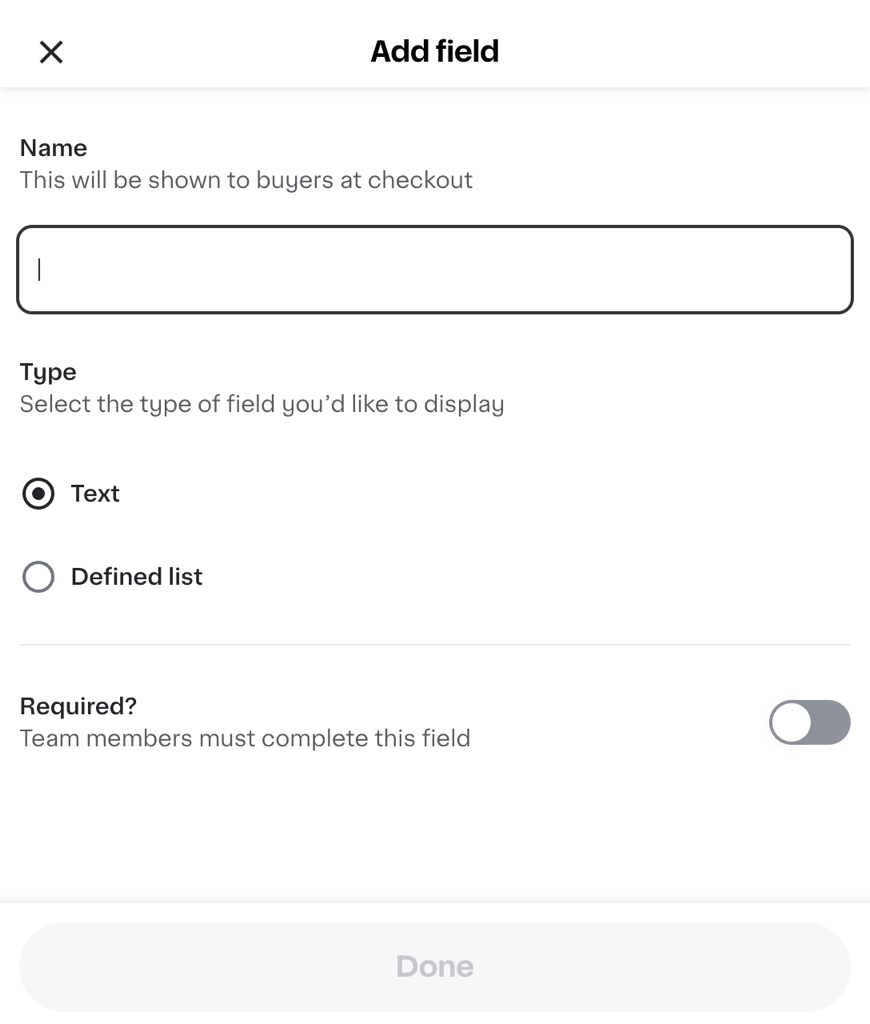
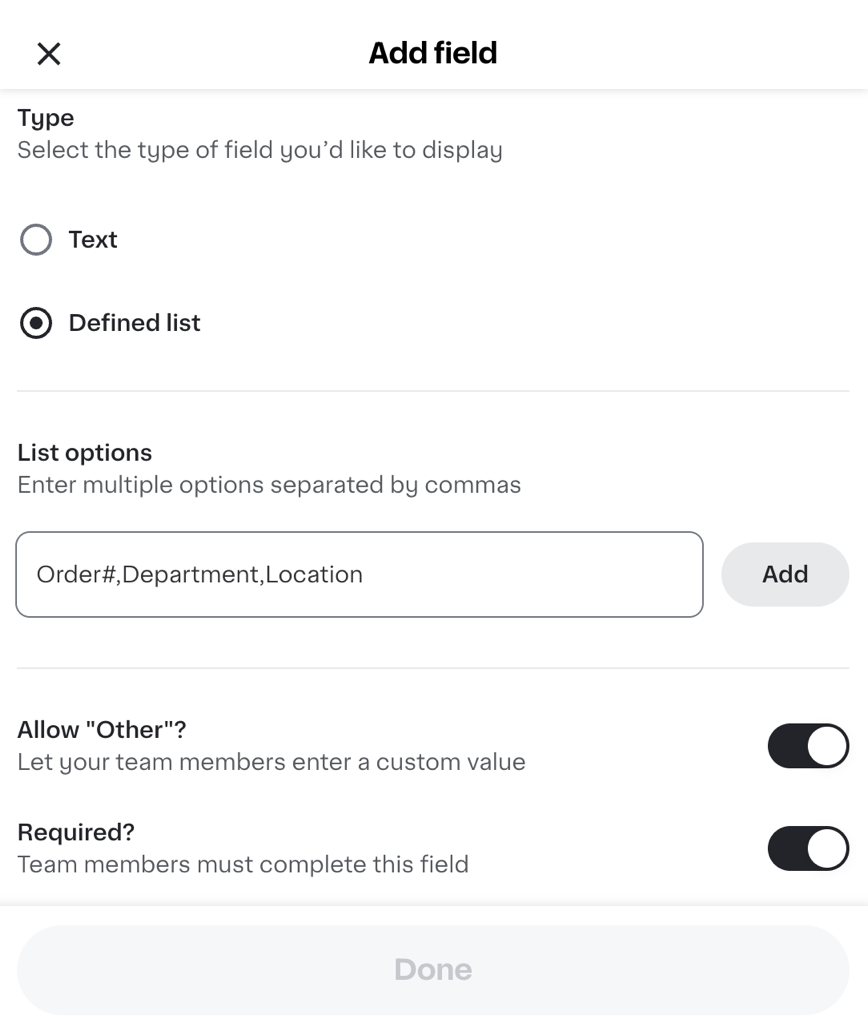
Custom fields
Administrators can create custom fields that appear for team members during checkout. These fields help categorize orders for tracking purposes. The collected data appears in the dashboard and exported reports.
When creating custom fields, administrators can define the following:
- Name. The name of the field. This name is not shown to team members at checkout.
- Type.
-
Text. A text box where team members can enter any information. This field can be marked as required.
-
Defined list. A list of options for team members to choose from. This field can be set as required. Administrators can also set this field as "Other," where team members enter a custom value.
-
When a team member checks out, they can provide information from the Business order details tile. If a team member doesn't view the business order details and there are required fields, they are prompted to update the order details before proceeding through checkout.
Tax exemption
Many types of businesses are exempt from sales tax when buying for business-related purposes. Administrators can submit forms and supporting documents to identify their tax exemption category by state. After Instacart validates the forms, applicable taxes aren't charged on eligible orders.
The Tax exemption page is available under Business Settings in the business account menu.
The following image shows the Tax exemption page on a mobile device:

Currently, tax exemptions are limited to Marketplace Facilitator (MPF) states. For businesses in non-MPF states, tax exemption is possible but requires additional configuration. For more information, contact the Instacart Business team.
Instacart+
If the business owner is subscribed to Instacart+, the subscription can be shared with four additional team members. To share the subscription with more team members, higher tiers of Instacart+ are available by contacting business@instacart.com.
- Instacart+ offers a business-specific benefit of 2% credit back on orders above $250.
- For customers with both a personal and business account, Instacart+ benefits are shared across both profiles.